Intro to Audio in Unreal Engine 5
A high-level overview of key audio features in UE5
Intro
This is an introductory guide designed to highlight the core audio systems in Unreal Engine 5. It’s part literature-review and part “insights I’ve gained over the last year”. I will cover some pretty basic audio features because I believe there are subtleties that are often missed, but breakdowns will not be exhaustive.
Supplementary and nonessential context will be inlined, but anything related to Unreal Engine will be laid out in the Links section. This will hopefully make this blog more useful to refer back to later.
If you’ve got 2 hours to spare and want to delve even further, Dan Reynolds’ Unreal Audio Essentials talk1 is a fantastic resource. His insights provided the basis for the blog.
Additionally, I’ve created a plugin to demonstrate various concepts. I’m hoping to expand on it and link back to this blog as appropriate. https://gitlab.com/guonaudio/UE5/AudioExtras
Unreal Engine
First off, there’s no decoupling Unreal’s audio systems from the wider engine, and understanding the core engine is necessary to avoid common pitfalls. So let’s take a quick look at the fundamentals.
Architecture
Starting with a Hello World style example » if you drag a Sound Wave asset into a level and press the play icon to start PIE, you should hear audio playing. To achieve this, Unreal has automatically:
- Created an Actor
- Attached an Audio Component to it
- Set its Sound to the dragged in Sound Wave
- Started playback (due to Auto Activate being enabled)
Although seemingly simple, each step has complexity worth unpacking. Actors are what Unreal terms ‘objects that can be placed in a level’. These can be augmented with modular functionality by attaching Scene Components and Actor Components, where the former have transforms (like Actors) and the latter do not. Transforms are the set of values that define the location, rotation, and scale of an object. So in brief » Actors exist at some location in the level, Scene Components exist at some location on the Actor, and Actor Components simply house logic.
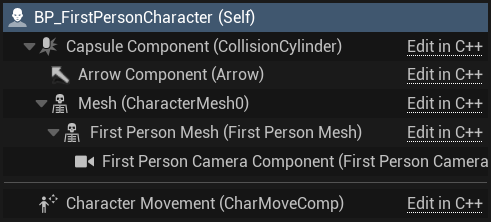 Hierarchy showing a Character type Actor with various Scene Components, some of which are nested within other Scene Components; as well as an Actor Component (shown under the separator)
Object Lifetime
Once we have a handle on creating stuff, we need to think about how long they are going to stick around for. The Hello World example demonstrated static creation (via the editor), but objects can also be created dynamically (via code). They can later be destroyed directly by calling their destroy function, or indirectly as a result of an upstream object being destroyed (such as a level ending). The important thing we need to think about is » what should happen to our sound if it’s attached to an object that’s being destroyed?
The image below shows a function that spawns and returns an Audio Component and plays the defined sound. Each pin I’ve highlighted plays a role in lifetime considerations.
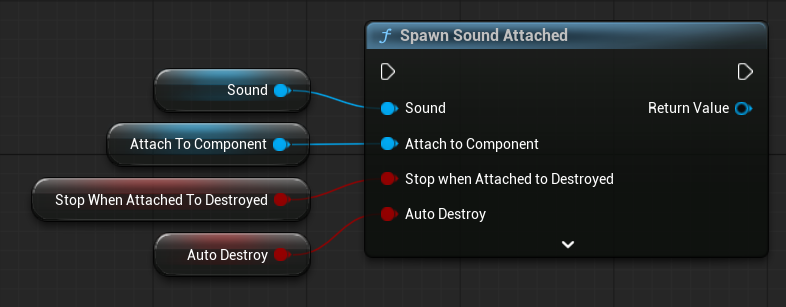 ‘Sound’, ‘Attach to Component’, ‘Stop when Attached to Destroyed’, and ‘Auto Destroy’ are important pins to note when considering audio lifetime
Sound lifetime comes in two forms » oneshot or looped. A oneshot sound will stop when it finishes playing, but a looped sound needs to be stopped manually. This is a technical designation and is unrelated to how you may be familiar with oneshot SFX such as impacts. If a 10 minute music track is not marked as looping, then it’s classified as a oneshot. As we’ll in the Notes & Observations section, this important ramifications.
Attach to Component sets which Component the Audio Component will be attached to (since an Actor can be made up of many Scene Components, we need to be specific). Stop when Attached to Destroyed then does what it says (referring to the object it’s attached to), and Auto Destroy controls whether the Audio Component should be destroyed when the sound stops.
There are many configurations we can set from the above, and our choices will depend on what we intend to achieve. It’s enough for now to simply be aware of these concepts, referring back the above when creating new Audio Components.
If a sound stops suddenly, or continues playing longer than expected, it’s likely that its lifetime is set up incorrectly.
Threading
If you’re not familiar with the concept of threads, you can think of them as domains. It’s not necessary to have a deep understanding of the topic, just know that parts of the audio engine are split across these distinct domains.
| Thread | Sync | Domain |
|---|---|---|
| Game Thread | With Video (FPS) | Blueprints, Audio Component, GC |
| Audio (Logic) Thread | With Game Thread | Audio Logic, Render Candidacy |
| Audio Render Thread | Async | Audio Rendering, Mixing, DSP |
Here is a brief example of how these threads can be traversed, demonstrating that although the topic is technical, the mechanism is fairly simple:
Playfunction is called on Audio Component- Request for Sound to play is sent to the Audio Thread for evaluation
- If successful - request is sent to Audio Render Thread
- Sound plays through speakers
Thread separation is why we can play music that persists uninterrupted between levels transitions.
Audio Components
As you’ve likely gleaned by now » Audio Components are the objects that allow us to issue instructions on our sounds. They may seem like speakers or jukeboxes, but its better to think of them as remote controls. This is because:
- As alluded to in Object Lifetime, an Active Sound can outlive its Audio Component
- As discussed in Threading, Active Sounds and Audio Components live in different domains
Besides the above nuance/pedantry, Audio Components are pretty simple. They are the Components that augment Actors with the ability to play and handle audio. To find out what sorts of actions you can perform on an Audio Component » in Blueprints, drag from the output pin of an Audio Component into some empty space and look in the Components/Audio category.
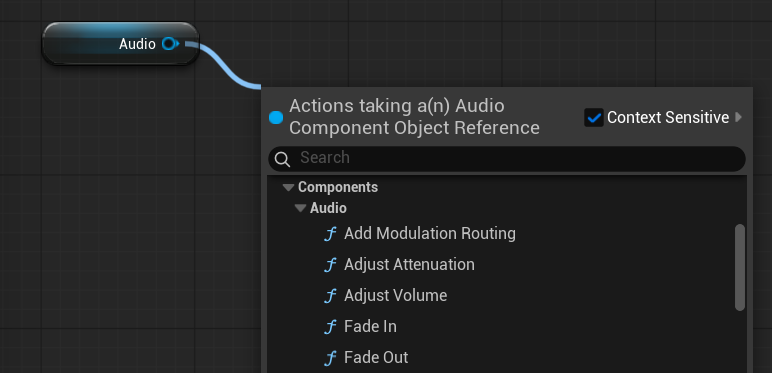 A small selection of functions that can be called on Audio Component in Blueprints. Some other important functions include Play, Stop, and the various parameter setting functions
Unreal Audio
With the core engine/game thread stuff out of the way, let’s take a proper look at audio now. The diagram below is a simplified view at the main features I want to highlight and how they hook together. This represents typical use, and shouldn’t be considered as fixed. Many audio systems can be routed in complex ways, but that’s a topic for another blog.
---
config:
  flowchart:
    curve: "linear"
    nodeSpacing: 20
    rankSpacing: 50
    htmlLabels: true
---
flowchart
    classDef tugger stroke-dasharray: 9,5,stroke-dashoffset: 250,animation: dash 2s linear infinite alternate-reverse;

    att["Sound<br>Attenuation"] --> sg_snd
    con["Sound<br>Concurrency"] --> sg_snd
    cls["Sound<br>Class"] --> sg_snd
    fx["Source<br>Effect"] src2fx@<--> sg_snd
    class src2fx tugger

    subgraph sg_snd [ <b>Sound Base</b> ]
        snd_wav["Sound<br>Wave"] --> snd_ms["MetaSound"]
        snd_bus["Source<br>Bus"]
    end

    subgraph sg_mod [ <b>Audio Modulation</b> ]
        mod_param["Modulation<br>Parameter"] --> mod_cb["Control<br>Bus"]
        mod_cbm["Control<br>Bus Mix"] --> mod_cb
    end

    sub_sub["Submix"]

    sub_fx["Submix Effect"] sub2fx@<--> sub_sub
    class sub2fx tugger

    bus_bus["Audio Bus"]

    sg_snd snd2bus@--> bus_bus
    snd2bus@{ animate: true }
    bus_bus bus2sub@--> snd_bus
    bus2sub@{ animate: true }

    sg_snd snd2sub@--> sub_sub
    snd2sub@{ animate: true }
    mod_cb -.-> sg_snd
    mod_cb -.-> sub_sub

    snd_bus sbus2sub@--> sub_sub
    sbus2sub@{ animate: true }
Sound
A Sound Base, generally just referred to as a Sound, is to a type of audio asset that can be played back. It is the base class for Sound Cues, Sound Waves, MetaSound Sources, and Source Buses. You won’t interact directly with the Sound Base class, but it can be preferable to use this type when creating public variables, as it offers the flexibility to swap between the above asset types without code changes.
Sound Cues
 This is the legacy system for handling audio playback logic. They have been deprecated in Unreal Engine 5, so I won’t discuss them further. Unless you’re supporting a legacy project, you should avoid using them. Instead, you should use MetaSounds, because MetaSounds:
- Support all the same features as Sound Cues (and a lot more)
- Are generally more efficient
- Can be further optimized for different hardware using MetaSound Pages2 3
MetaSounds
MetaSounds come in Source and Patch varieties. The main difference is that Sources can be played and Patches are reusable code blocks. For brevity, I am only referring to the Source variety and simply calling them MetaSounds. The distinction is otherwise unimportant.
 Despite being a flagship audio feature, MetaSounds is not always well understood. When it was first announced I heard questions such as “how does MetaSounds compare to Wwise?” or even “can it replace my DAW?”. These are pretty asymmetric comparisons as MetaSounds is only one piece of the audio puzzle whereas Wwise is a two decade old enterprise middleware package. However, the asymmetry does lean the other way in some regards, as there isn’t really any commercial alternative to MetaSounds.
To elaborate » MetaSounds is a graphical patching environment for controlling audio playback at a very low level. Where the authoring side of middleware abstracts away fine-grained control, MetaSounds instead offers deep customization. In practice, it’s more similar to PureData or Max, but tailored to game audio and tightly integrated with Unreal.
There are already great guides online that cover general usage45, so I’m not going to retread that ground. Instead, I want to provide a general structure to help you approach MetaSounds with the right mindset.
Shape
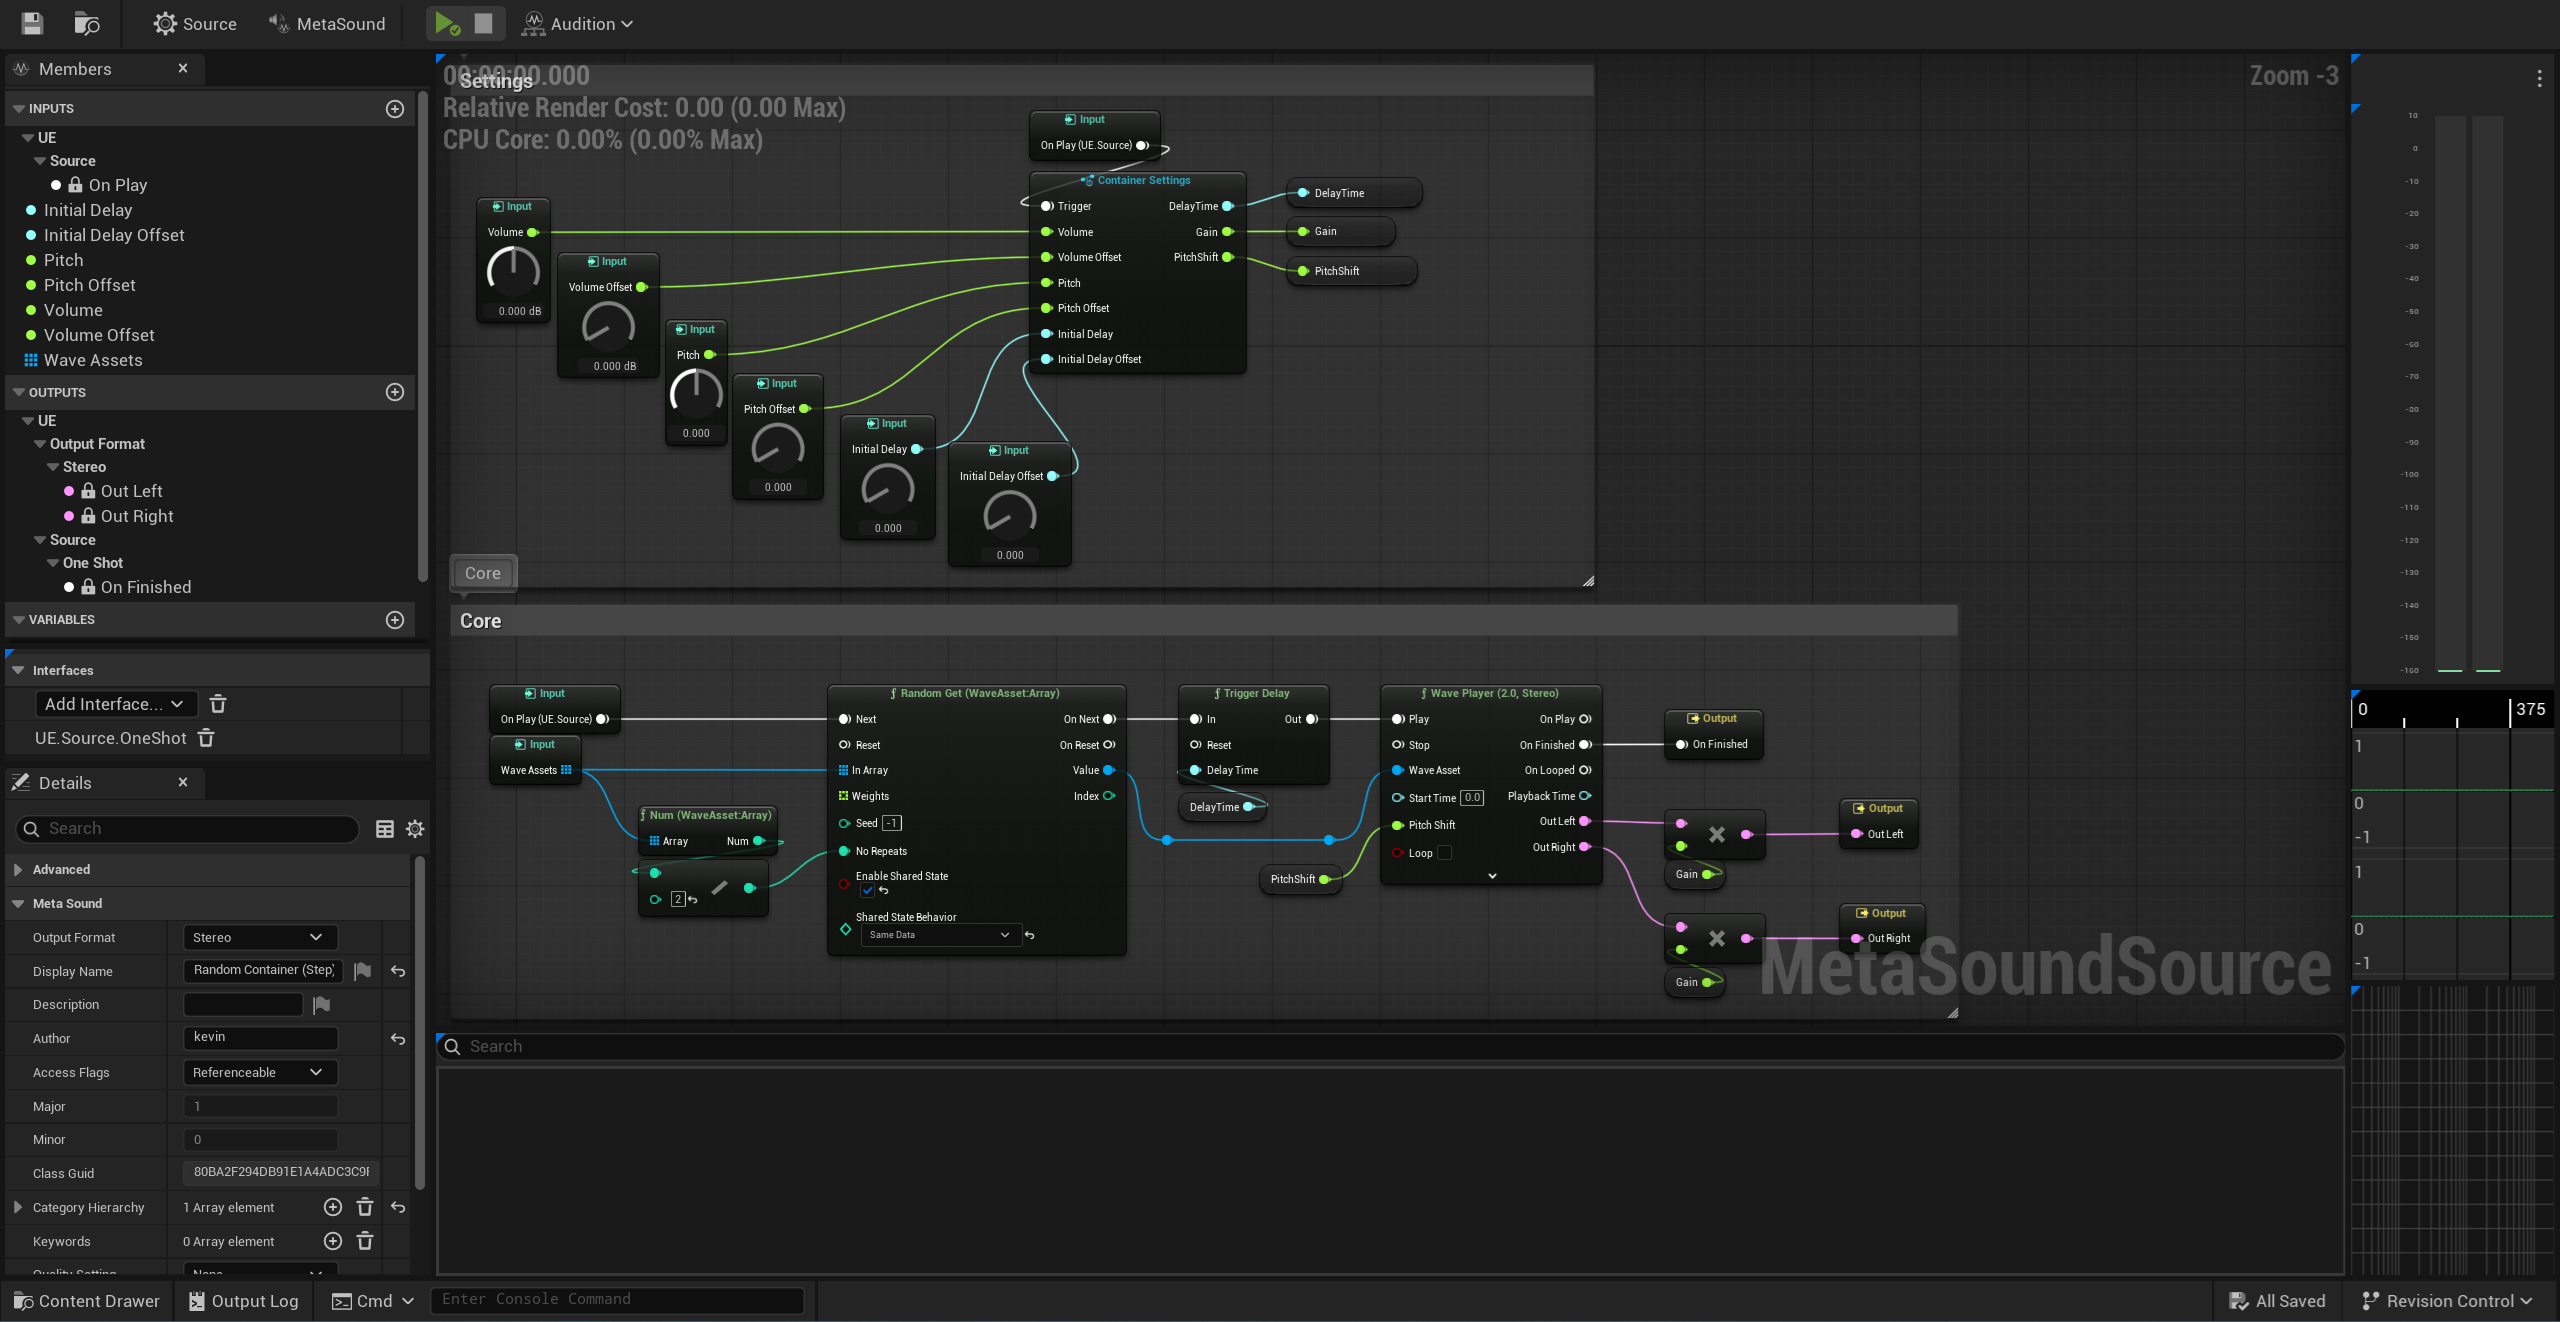 Viewing the MetaSound graph editor. Besides a right-click menu that allows accessing nodes, most things are presented right in front of you with very little hidden away.
MetaSounds doesn’t function like Blueprints, even if it looks like it should (a closer parallel is Unreal Engine’s Material shaders). Blueprints can have their Tick function dynamically changed at runtime or disabled entirely. They can also run async code, and generally offer a level of flexibility that is ill-advised when creating DSP graphs.
On the other hand, a MetaSound has a fixed update that ticks consistently for as long as the MetaSound is active. Each one of these update ticks is referred to as a block, and the update frequency is referred to as the block rate. The formulas below can be used to figure out how many samples there are in each block, as well as how long that equates to in seconds.
\[\text{samples} = \frac{\text{samplerate}}{\text{blockrate}} \] \[ 480 = \frac{48\,000\,\text{Hz}}{100\,\text{Hz}} \] \[ \text{duration} = \frac{\text{samples}}{\text{samplerate}} \] \[ 0.01\,\text{s} = \frac{480}{48\,000\,\text{Hz}}\]Sample (Audio) Rate
The primary function of a MetaSound is to generate Audio. For this we have a wave player and several synthesizers. Output signals from these nodes can be further processed by a suite of filters and effects, or modulated by other signals such as envelopes. These signals operate at Sample Rate » 48kHz by default.
Block (Control) Rate
Since we’re dealing with interactive audio, we likely want to design some dynamic playback logic. To facilitate this, MetaSounds offers a slew of other data types including Bool, Int32, Float, and even entire objects. These types are processed at Block Rate » 100Hz by default.
There is also the Trigger type, which is special because it can address specific samples within a block. It is able to do this because it is functionally an array that stores indexes. Most of the time, we’re simply adding 0 to the array, which fires at the beginning of a block. However, for something like the Wave Player’s On Nearly Finished, MetaSounds looks ahead to see if the next block contains the final lot of samples for a given audio file. To ensure sample-accurate playback concatenation, it doesn’t simply ‘trigger’, it actually stores the index of the final sample. When passing this to the Wave Player’s Play input as a delayed variable (mentioned below), the Wave Player will finish playing the final lot of samples before immediately adding samples from the next audio file to play - mid-block.
Input / Output
Inputs & Outputs are how we transmit data between the various systems. We can reuse MetaSounds inside other patches and hook them together using these. It is also the way we move data to6 and from7 the game thread. Values stored in these Inputs can be changed:
- Statically – directly in the MetaSound or by overriding values in Presets
- Dynamically – by setting parameters via code
Adding an Interface generates Inputs and Outputs that automatically get the specified data at runtime. These operate like the Wwise’s or FMOD’s Built-In Parameter options. For example, UE.Attenuation gets the distance between the listener and sound location in game units (cm by default).
Variables
Variables are a great tool for cleaning up MetaSounds and reducing the inevitable clutter that can result from visual scripting. MetaSounds are code after all, and clear descriptive naming goes a long way.
However, the true utility of variables comes from their ability to get a signal from one frame prior. MetaSounds does not allow infinite loops, so if we want to pass an output back into an input, we need to delay it by one frame.
You can create categories for Inputs/Outputs and Variables by putting full-stops between words.
Notes & Observations
Middleware uses the term ‘voice’ to refer to a unit of active audio. Unreal doesn’t have consistent verbiage for this. In Project Settings, Max Channels controls what Wwise terms the Voice Limit, In Sound Concurrency the term ‘voice-stealing’ is used, but in code, so-called voices are termed ‘Active Sounds’. Since channels can also refer to routing (such as stereo or 5.1), and voices can refer to human vocals, I’ll stick to using Active Sounds when referring to this concept in Unreal.
1 Audio Component = 1 Sound Base = 1 Active Sound
This is different than in Wwise where one Game Object can be responsible for many voices. If you need to coordinate several distinct but related Audio Components, you will need to manage that in code. Alternatively, you can create a monolithic MetaSound.
It is possible for an Audio Component to play simultaneous sounds by enabling ‘Play Multiple Instance’, but this is intended for retriggering the same sound multiple times.
MetaSounds Do Not Have Local Scope
If you’ve created custom functions in Blueprints, you’ve likely used local variables before. These get reset when the function finishes i.e. when they ‘go out of scope’. This is not true in MetaSounds when nesting patches. Variables are only reset when a MetaSound stops, and Inputs are set to the most recent value stored in their Audio Component, or default if unset.
If a MetaSound behaves correctly when played directly, but doesn’t when nested within another MetaSound » it may need its internal states resetting.
Oneshots Are Not Virtualized
If a oneshot is evaluated and deemed inactive, it will be stopped. Only loops can be virtualized. Sound Waves can be manually defined as looping via their settings, but MetaSounds are inferred to be looping if they do not implement the UE.Source.OneShot Interface.
If your ambience stops when you go out of range and doesn’t restart when you get near » it is likely defined as a oneshot.
MetaSounds Are OneShot by Default
When you create a new MetaSound Source, you’ll find that the UE.Source.OneShot is implemented by default. Taking the above into account, you’ll need to decide whether that is valid for your sound. If you do stick with the default, just be sure that the UE.Source.OneShot.OnFinished output is triggered eventually. This can be tricky to get right for complex patches, so test thoroughly.
If sounds are cutting out unexpectedly, it could be that active but inaudible (i.e. orphaned) oneshots are maxing out your Active Sound budget. Audio Insights8 and Unreal’s various console commands9 should help you to rout out these issues.
Wave Files Are Streamed by Default
Unreal stores the first chunk of audio for a given file in memory and streams subsequent data from disk. Storing the first chunk ensures fast playback without needing to load everything into memory. Behavior for when the chunk is loaded and how long it is kept in memory for can be defined on a Sound or Sound Class as follows:
| Loading Behavior | Tooltip |
|---|---|
| Load on Demand | Chunk is loaded when played or primed |
| Prime on Load | Chunk is loaded when asset is loaded |
| Retain on Load | Chunk is kept in memory |
| Force Inline | Non-streamed |
Use MetaSound Presets!
This is just a PSA to use presets. Right-click any MetaSound Source and select Create Preset, then open them up, enable Override Inherited Default on any inputs you would like to customize, and set new values as appropriate.
If you ever find yourself copy-pasting MetaSounds, consider whether a Preset would be more efficient.
Routing
With our carefully set lifetimes playing well designed sounds, we’re ready start sending our audio further afield. The two systems we have to deal with this are Buses and Submixes.
Buses
 Buses are the means by which we can move audio around Unreal. They come in Audio Bus and Source Bus variants. The former simply carries audio and the latter provides an end-point to play Audio Buses back in game.
The only setting which can be changed on an Audio Bus is its channel count. Otherwise, it simply holds audio data.
Source Buses are similarly simple, with the only distinct setting being the Audio Bus input, channel count, and duration. Otherwise, they operate like any other sound. The purpose of this asset is to allow playing bussed audio in game » a feature which is used in Fortnite to play music diegetically via in-world speakers10.
Submixes
 This is the final link in the audio chain, representing the point at which audio signals are mixed down before rendering. The term comes from the audio engineering world where related elements of a track are summed into a single channel called a submix.
Opening a Submix asset reveals a graph where you can define the relationship between Submixes. For example, you can create a ‘bird’ Submix which routes into an ‘ambience’ Submix which finally routes into an output Submix. This is where you’ll want to do your high-level static mixing, balancing the various groups against each other.
---
config:
  flowchart:
    curve: "linear"
---
flowchart LR
    Birds[🐦 Birds] --> Ambience[🍃 Ambience] --> Main[🔊 Main]
    Insects[🪲 Insects] --> Ambience
    Music[🎼 Music] --> Main
Once a good static mix is in place, Audio Modulation then provides the tools needed to design interesting dynamic mixes. This means Submix volumes can be modulated in response to gameplay.
Submixes supersede Sound Classes as a means to mix audio in Unreal Engine 5.
Render Order
Understanding the render order is important for establishing proper gain staging. It also serves as a structured checklist for if we need to debug. Below is a diagram transcribed from Dan Reynolds’ talk1 that visualizes the source render pipeline.
---
config:
flowchart:
nodeSpacing: 20
rankSpacing: 20
nodePadding: 100
---
flowchart LR
src[Sound<br>Base<br> ]
srcvol[Source<br>Volume<br> ]
prefsnd[Pre<br>Effect<br>Send<br><br>Bus<br>↓]
srcef[Source<br>Effect<br>Chain]
att[Distance<br>Attenuation<br> ]
poefsnd[Post<br>Effect<br>Send<br><br>Bus<br>↓]
subsnd[Submix<br>Send<br><br><br>Submix<br>↓]
spat[Spatial-<br>ization<br><br><br>Submix<br>↓]
src --> srcvol
srcvol --> prefsnd
prefsnd --> srcef
srcef --> poefsnd
poefsnd --> att
att --> subsnd
subsnd --> spat
And the above is only the first part of a larger render pipeline which is processed in the following order:
flowchart LR
    Source[Source] --> Bus[Bus] --> Submix[Submix]
Render order isn’t something that usually requires much conscious thought. However, there are some cases where it might catch you out. For example, if you want to send a Submix signal to a Bus, you will incur 1 frame of latency. This is because it has to queue it up for the next render pass in order for signal to be passed back down the chain.
I found this out when attempting to bus a 2D ambience Submix to play as a 3D sound emanating from a window when indoors. The source and bussed signals could not be layered as the buffer delay caused a comb filtering effect. I got the desired outcome by bussing directly from the sources instead.
Other Audio Essentials
Sound Classes
 Sound Classes offer a means of categorizing sounds separately from how they are mixed. They can be used for batch applying settings, with two notable settings being
 Apply Ambient Volumes and Loading Behavior Override. The former relates to Audio Gameplay Volumes11 and the latter sets how streaming/loading is managed (mentioned above under note and observations).
You may want to use Sound Classes to ensure short frequently played sounds such as UI or impacts are always primed and ready.
Sound Classes also support Audio Modulation, but unlike Submixes, Sound Classes can be used to modulate pitch, highpass, and lowpass.
There are a few more settings worth investigating but they are fairly niche. Sound Classes feel a bit anachronistic, especially since newer features use audio metaphors rather than coding ones. In any case, they aren’t particularly complex, and you shouldn’t need them much outside of the above.
If you’re using Audio Gameplay Volumes11 and find that transiting a volume isn’t affecting audio, the sound either doesn’t have the appropriate Sound Class set, or its
Apply Ambient Volumessetting hasn’t been enabled.
Sound Attenuation

Sound Attenuation is responsible for enabling 3D audio playback, but it’s also where we can enable a few other features such as quick and cheap audio occlusion. It’s a well documented12 system and it’s been around a while, so here’s the TLDR:
Enable Volume Attenuationmakes sound quieter over distanceEnable Spatializationpans sound relative to the listener’s orientationEnable Air Absorptionallows reducing high frequencies over distance to mimic how sound behaves in reality
Sound Concurrency
 Sound Concurrency limits the number of active sounds playing at any given moment, which improves performance and ensures a cleaner mix. Like the above, it’s an old feature that’s intuitive and well documented13. The TLDR is:
Max Countsets the max limit for all sounds which have this Sound Concurrency appliedResolution Ruledetermines how to sounds are prioritized when the max count is exceeded
The rest of the features largely control the qualitative aspects of the virtualization/realization process.
I’m not sure why this cannot be set at the Sound Class level, but you could script this behavior yourself. Alternatively, you could use the Property Matrix14 feature to batch apply Sound Concurrency.
Effects
These don’t seem to be well documented, but they are simple to set up and use. They come in Source Effect and Submix Effect variants, with the name implying where they are inserted.
 Source Effects may seem less necessary now that MetaSounds exists, as many have MetaSound node equivalents, such as Filter, Delay, and Stereo Panner. However, some Effects (such as Convolution) do not have an equivalent. Additionally, it’s not possible to apply MetaSound nodes outside of MetaSounds, so Source Effects are still required for processing other types (such as Source Buses). And as highlighted in routing, signal can be sent to an Audio Bus pre and post Source Effect, which may be an important consideration in certain situations.
If you want your sounds to Doppler shift » add a Source Effect of type
Simple Delayand ensureDelay Based on Distanceis enabled.
 Submix Effects are as important as ever as they allow applying EQ, dynamics processing, and reverb to entire groups of audio. This is much better for performance, easier to manage than doing it on a per-source basis, and allows for processing a group consistently for all audio passing through.
Audio Modulation
On the surface, this system’s name is pretty self-explanatory, but it’s impressively deep and complex15. The potential applications for this system are broad, but the key use-case is dynamic mixing16. For example, you can:
- Hook up Submixes to user-facing volume sliders
- Create mix ‘snapshots’ that dynamically reflect gameplay state
- Process parts of the mix depending on time of day
 Control Buses are the core of this system. They operate similar to Audio Buses, but carry control data rather than audio data (similar to a VCA in the analog world).
 A Control Bus’s type is determined by its Modulation Parameter. This affects both what it can modulate and how it combines when several modulators are applied to a Control Bus simultaneously. For example, volume is additive, but filter cutoffs are determined by taking the most extreme value.
 Control Bus values can be set at a global level, which is fine for simple always-active types such as time of day. But in most other cases, Control Bus Mixes are the way to go. These encapsulate and create relationships between Control Buses, with the added benefit of making code implementation cleaner.
- Here’s a worked example of how these can be linked together:
You want to allow the user to adjust their volume so you set up a Control Bus Mix with Control Buses for Music, SFX, and Ambience, and their Modulation Parameters set to Volume. Later, you decide you need a ‘boss fight’ mix that increases the volume of Music and SFX, but decreases the volume of Ambience. Since you’ve already set up the Control Buses for these, you only need to create a new Control Bus Mix, tagging with the existing Control Buses, and setting appropriate values.
Because the Modulation Parameters are Volume types, if the user sets the Ambience volume to -6dB, and the ‘boss fight’ Mix sets it to -3dB, then the final adjustment will be -9dB. This is really neat! The values are not being overwritten, and instead work in an intuitive manner.
If you attempt to use a modulator with an incompatible type, you will get the following warning:
ControlBusName (InputType), Expected: (OutputType)
To get around this you can use a Parameter Patch, which allows you to remap Control Buses to different types, as well as create custom curves.
Links
Unreal Audio Essentials (Abridged) - Dan Reynolds
https://youtu.be/swS6Zch4m90 ↩︎ ↩︎2MetaSound Pages - Official Docs
https://dev.epicgames.com/documentation/en-us/unreal-engine/metasound-pages-in-unreal-engine ↩︎MetaSound Pages Optimization Guide - Dan Reynolds
https://youtu.be/MjoqY_cUUNQ ↩︎Introduction to MetaSounds - Dave Raybould
https://dev.epicgames.com/community/learning/tutorials/BKPD/unreal-engine-introduction-to-metasounds ↩︎Understanding MetaSounds: A Technical Guide For New Designers - Dan Reynolds
https://youtu.be/zS422olBeG0 ↩︎Introduction to MetaSounds - Controlling from Blueprints - Dave Raybould
https://dev.epicgames.com/community/learning/tutorials/BKPD/unreal-engine-introduction-to-metasounds#controllingmetasoundsfromblueprints ↩︎MetaSounds - Output Watching - Official Docs
https://dev.epicgames.com/documentation/unreal-engine/metasounds-reference-guide-in-unreal-engine#outputwatching ↩︎Audio Insights - Official Docs
https://dev.epicgames.com/documentation/unreal-engine/audio-insights-in-unreal-engine ↩︎Audio Console Commands - Official Docs
https://dev.epicgames.com/documentation/unreal-engine/audio-console-commands-in-unreal-engine ↩︎Unreal Engine Audio Systems In Fortnite - Seth Weedin
https://youtu.be/MGcZM4luz5g ↩︎Audio Gameplay Volumes - Official Docs
https://dev.epicgames.com/documentation/unreal-engine/audio-gameplay-volumes-quick-start ↩︎ ↩︎2Sound Attenuation - Official Docs
https://dev.epicgames.com/documentation/unreal-engine/sound-attenuation-in-unreal-engine ↩︎Sound Concurrency - Official Docs
https://dev.epicgames.com/documentation/unreal-engine/sound-concurrency-reference-guide?lang=en-US ↩︎Property Matrix - Official Docs
https://dev.epicgames.com/documentation/unreal-engine/property-matrix-in-unreal-engine ↩︎Audio Modulation - Official Docs
https://dev.epicgames.com/documentation/unreal-engine/audio-modulation-reference-guide-in-unreal-engine ↩︎Audio Modulation Quick Start - Official Docs
https://dev.epicgames.com/documentation/unreal-engine/audio-modulation-quick-start-guide ↩︎